 Creating a custom truss symbol
|
Command |
Workspace: Path |
|
Convert to Truss |
Design Suite: Entertainment > Rigging/Braceworks Spotlight: Spotlight > Rigging/Braceworks |
Vectorworks Spotlight ships with a comprehensive set of truss symbols, but you can create a truss from your own symbol as well. Various parameters are required for truss symbols to be valid. Once the parameters have been set for the symbol, it is saved as a truss resource, so the parameters only need to be set one time.
Cross section information is required for valid Braceworks calculations; if there is no identified cross section, calculations will not be complete. When a cross section is selected for one Geometry Type in the Truss Properties dialog box, it applies to all four types.
To convert a symbol to a valid truss:
Follow the steps in Creating symbol definitions to create a hybrid symbol that serves as the basis of the truss. The bottom of the chord that is snapped to should be at a Z height of 0.
Truss symbols need to include at least one 3D polygon so that loads have something to snap to. Add a 3D polygon (with the 3D Polygon tool) to the main chords. You can also add additional 3D polygons for snapping purposes. The chord polygons should be placed into the Rigging-Truss-Chord Snapping class, which is hidden by default.
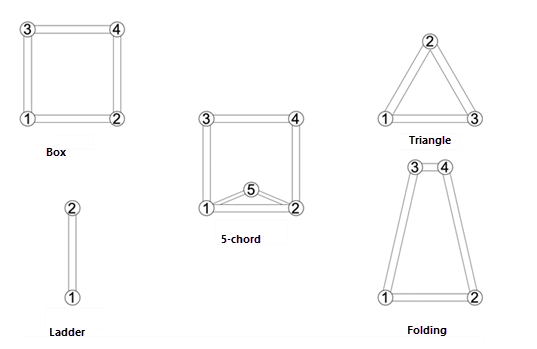
Attach a Truss Chord Info record to each snapping polygon. Each record has a Chord Width record field (in document units) and a Chord ID record field. The Chord ID value must be unique for each truss; the diagram below shows how various truss types have been numbered according to Vectorworks' standards.

Truss symbols with chord numbering in 3D Right view
Attach magnets to the geometry as described in Placing magnets manually.
Select an instance of the symbol.
Select the command.
If you are inserting a truss symbol that does not have all the required parameters for structural analysis, the Truss Properties dialog box opens.
Set the parameters for a valid straight, corner, hinge, or circular (curved) truss, as described in Setting custom truss parameters.
An alert opens. Click Yes to convert current instances of the symbol to trusses and create a truss resource. Click No to cancel the operation.
A truss resource is created in the current file based on the original symbol and its specified data. The truss can be selected from the Resource Manager or the Resource Selector on the Tool bar for future placement in the drawing.
